Monday, March 1, 2010

Understanding User Account Control in Windows 7

Friendly Computers would like to share with you this article.

User Account Control, otherwise known as UAC, was regularly cited as one of Vista’s problems and was even the subject of an Apple advertisement.  However, this feature has greatly increased the security of Vista computers, and today we’ll see how it’s been improved in Windows 7.

What is UAC?

UAC is a feature of Windows Vista and 7 designed to prevent unauthorized changes to your computer.  Recent versions of Linux and Mac OS X have similar prompts when changing settings or installing programs as well.  This is a crucial feature that makes your computer much more secure.

By default, even an administrator account in modern versions of Windows does not have full access to modify system settings and install programs.  Thus, if you try to install a program or change critical settings, you may see your desktop fade and show only a prompt window asking if you’re sure you want to do this.  This is a secure desktop, designed to prevent a program from automatically approving itself.

image68

While this may simply seem like a nuisance, it actually protects your system from malicious programs.  For instance, if you inserted a flash drive that had a worm virus into your computer, it would attempt to automatically run and install on your computer without your knowledge.  UAC, however, would catch it, and ask you whether or not you wanted to install the program.  You could easily know that you did not want it since you did not initiate the install, and thus you would protect your computer and data.

What types of UAC prompts may I see?

The UAC prompt you see may vary depending on the program you are installing.  If you are installing or configuring a program that has been signed with a security certificate, the prompt may look something like this.  Notice that it shows the program’s name, publisher, and origin.
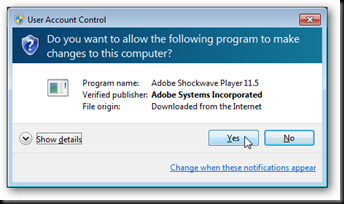
image69

If you click Show details, you can see where the file is stored and can view its security certificate.

image70

Unsigned applications may show a different UAC prompt.  It states that the publisher is unknown, and since it is unsigned there is no certificate to view.  Additionally, this prompt has a yellow banner which alerts that the program is from an unknown publisher.
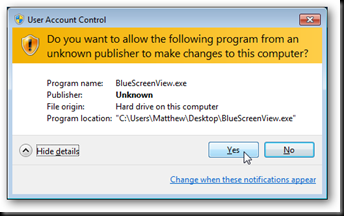
image71

If you’re using a standard account in Windows, then you will be required to enter the administrative password to accept a UAC prompt.

image72

When will I see a UAC prompt?

Usually it is fairly easy to tell when you will see a UAC prompt.  First, installing or making changes to any application, or for that matter changing any file that is outside your User folder will require you to authenticate the changes.  Some older programs may actually require a UAC prompt each time they run; this will only occur if they change critical settings or store files in secure folders every time they run.  You may notice a shield icon on programs or installers that will launch a UAC prompt before running.

image73

Windows Vista always created a UAC prompt whenever any Windows settings were changed.  In Windows 7, the default is to not prompt you when changes are made to Windows.  However, changing some critical settings, such as the UAC settings, will cause a prompt.  You can tell when an action will create a UAC prompt by the shield logo over the Ok button or beside its name.
image74

Finally, you can choose to run any program in administrative mode.  This is helpful if, for instance, you need to change a setting via Command Prompt and need administrative privileges.  To launch a program in administrative mode, simply right-click on it’s icon and select “Run as Administrator.”  Doing this will always require accepting a UAC prompt.

image75

How can I change UAC’s settings?

In Windows Vista, UAC had two settings: on and off.  Windows 7 offers more granular controls for UAC.  Simply type “UAC” into your start menu search, and select “Change User Account Control Settings” to change how UAC works on your computer.

image76

This panel gives you direct controls on how UAC will work on your computer.  The default settings will notify you if programs try to make changes to your computer, but not if you change Windows settings.  As previously noted, changing certain Windows settings such as these UAC settings will still require approving a UAC prompt.
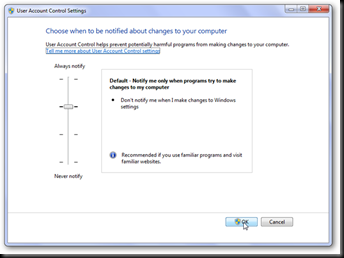
image77

The top setting is the absolutely most secure, and is how UAC worked in Windows Vista.  It will notify you whenever any change is made to your computer, including changing any Windows settings.

image78

The step down from the Windows 7 default settings is similar to the default settings in Windows 7, but will not dim the desktop when a UAC prompt comes up.  This may make your system less secure, as some malicious programs could automatically approve the UAC prompt when it is in this mode.
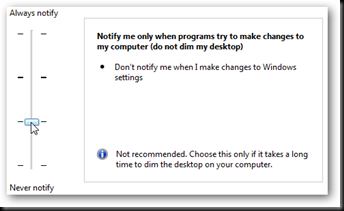
image79

Or, if you wish to never see a UAC prompt, you can select the lowest setting.  This leaves your system settings similar to Windows XP, which never prompts when any changes are made or programs are installed.  We do not recommend this setting, but it is available if you want it.  If you do choose to turn off UAC, the changes will not take place until you have restarted your computer.

image80

Conclusion

In our opinion, UAC is one of the best features in Windows Vista and 7 as it can keep your computer much more secure than it was in Windows XP and older versions.  UAC is also much less annoying in Windows 7, and you can adjust it to exactly the level of security you need.

Wednesday, February 24, 2010

How To Personalize Windows 7 Starter

Do you have Windows 7 Starter on your netbook? Friendly Computers think that this article will be very useful for you!

Microsoft removed many of the personalization options in Windows 7 Starter, the cheap edition for netbooks.  There is still a lot of stuff you can customize, though some of it is hidden, so here we’ll show you how to make your netbook your very own.

In all other editions of Windows 7, you can easily personalize your computer by simply right-clicking on the desktop and selecting Personalize.  This gives you a wide range of options to change, including themes, background, sounds, screensaver, mouse pointers, and desktop icons.image33This Personalization panel not available Windows 7 Starter, however.  If you right-click on the desktop, all you will see are options to change your resolution and add Desktop Gadgets.image27With a few quick Start Menu searches, though, you can rediscover many of the personalization settings.  Here’s how to change your window theme, screensaver, sounds, and more in Windows 7 Starter.  All of these options are in the normal Personalization panel in other editions of Windows 7, but here we’ll show you how to find them in Starter.

Sounds

It can be both useful and enjoyable to change your default sounds.  Anyone who’s booted a laptop during a meeting knows how annoying computer sounds can be.  Or, if you just want to make your PC sound different than the default settings, Windows 7 includes several very nice sound schemes.

Simply enter “change sounds” in your start menu search, and then select “Change system sounds”.

Here you can change or remove any of the sounds or even turn on or off the Windows boot sound.image29You can even choose one of the other sound schemes; 7 Starter still includes all of the new sound schemes!

Screensaver

Most netbooks will have no screensaver enabled by default, and instead will have the screen turn off when idle to conserve power.  If you would like your netbook to have a screensaver, Windows 7 Starter does still include all the default Windows 7 screensavers.  Simply type “screensaver” in your start menu search, and choose “Change screen saver”.

This will open the same screensaver option dialog you’re used to.  Choose the screensaver and settings you want.image32

Theme

By default, Windows 7 Starter uses the Aero Classic theme.  This is similar to the default Aero Glass theme on other editions of Windows 7, but without the transparency.sshot128If you prefer the classic Windows look (from Windows 95/98/2000/ME), or need to use a high contrast theme, you can still revert to this.  Type “theme” in the start menu search, and click the “Change the color scheme” link.

This opens the classic theme selector.  Choose the them you want, and click OK.

Here’s the Windows Classic theme on Windows 7 Starter.sshot120You can change your theme options in the Windows Classic theme, including the desktop background color.  Simply click Advanced in the previous dialog, click on the background color in the picture, and then choose the color you want from the box.

Background Picture

Windows 7 Starter does not allow you to directly change the background.  One of the best ways around this is the Slide Show desktop gadget.  To add this, right-click on your desktop, and click Gadgets.

Now, double-click on the Slide Show gadget, or click and drag it to your desktop.sshot124By default the gadget is small.  To make it larger, hover your mouse over the right hand side of the gadget, and click on the middle button with the arrow.Now the gadget will show a 320×240 image.

This actually looks fairly nice for a background, especially on the standard 1024×600 resolution screens on netbooks.sshot129 Desktop Icons

To change the icons for common items such as My Computer and the Recycle Bin, enter “icons” in the start menu search and select the “Show or hide common icons on the desktop” link.

Here you can show or hide icons, or can also change the icons for these items.sshot1321Select the item you wish to change, and click Change Icon.  You can select from icons included with Windows, or others you may have on your computer.sshot133Mouse Pointers

If you’d like to customize your mouse pointers, enter “cursors” in the start menu search, and choose the “Change how the mouse pointer looks” link.

This will open the classic mouse properties dialog, where you can choose mouse pointer schemes and change individual cursors.sshot137

Conclusion

Windows 7 Starter still has a lot of customization options, but they’re not as apparent as they are in other editions of Windows 7.  With these tips, you should be able to customize your netbook more than you originally thought possible.  And these all work without installing any 3rd party software!

Source: http://www.howtogeek.com/howto/11243/how-to-personalize-windows-7-starter/

Monday, February 22, 2010

Test Drive Windows 7

Friendly Computers found this article very useful for users who didn’t move to Windows 7 but thinking about it.

If you are reluctant to buy or work with Windows 7, because you are just not sure if that is the Operating System for you. Microsoft will allow you to test drive the program at their site.

When you try to run the test program, be sure you use Internet Explorer 8, version 6 or higher.

1TestDrive-400x266

Located at the VLabcenter, you can exercise running windows 7 Professional.

Select one of the options on the menu to the right.

An start the build process.

2BuildTestDrive-400x250

Provide the NTLM Authentication

2aNTLM-Authentication-400x196

NTLM Authentication

This is what the TestDrive Windows looks like in operation:

3TestDriveWindow-400x277

Test Drive Window

Starting to Explore using the Start Icon.

3aStartingToExplore-400x263

Starting To Explore

Besides using the visual tools available to test Windows 7, there are other options available to look at as well. For example, you can test XP Mode.

4XPMode-400x268

XP Mode

You can also test Network and HomeGroup operations.

5HomeGroup-400x235

Home Group

Using the vLabcenter is a fast and inexpensive way to test drive Windows7, and see what all the hoopla is all about.

The only condtions are that it must be run on Internet Explorer 6.0 or higher and you must have XP, vista, or Windows7 as the platform.

To get the most of the windows 7 test drive experience, choose a topic on the right that you would like to try.

A quick system check will be made to make sure that your machine has all the requirements needed to run the test.

A short “start-up” period may take place. Remember that this is a fully functional copy of Windows7 Professional that you will be working with. This provide you with a lot of hands on experience that can help you decide whether to commit your resources to the Windows 7 engagement.

You can access the VLabcenter here.

Source: http://windows7news.com/2010/02/16/test-drive-windows-7/

Monday, February 8, 2010

Folder Takes Ages To Load? Try This Fix

Do your folders take a lot of time to load? Friendly Computers want to help you and share this useful article.

I have one folder on my hard drive where I put all the downloads from the Internet on; Videos, photos, documents, music, programs and basically anything that gets downloaded. I noticed lately that it took a long time to open that folder in Windows Explorer. Or, to be more precise, a long time before the contents where sorted correctly in the folder. Windows Explorer would show that loading animation in the location bar and it took a few seconds before the files and folders were sorted properly.

I first thought it was related to the size of the contents which now occupied 247 Gigabytes of space on that hard drive. the 35k files and 485 subfolders could also have been a problem. Deleting some old contents in that folder did not fix the problem. I also tried switching the layout but every view mode resulted in the same problems.

Then I thought about other programs that might cause the problem. Antivirus software or shell extensions but none of this was the reason for the lag that was experienced whenever I opened that folder. All other folders opened fine but none had the size or files of that one folder.

Then I discovered the customize tab in the folder properties dialog which finally allowed me to fix the issue that I had.

The “optimize this folder for” pulldown menu was set to Pictures although pictures did not make up the bulk of the data. I switched that to videos, enabled the “also apply this template to all subfolders” option and et voila, the folder contents where being displayed immediately afterwards. I double-checked, reverted the changes to end up with the same slow loading folder. Applied the fix again and it was once again fast and without lag.

Source: http://windows7news.com/2010/02/04/folder-takes-ages-to-load-try-this-fix/

Wednesday, February 3, 2010

Turn Your Windows 7 Laptop into a WiFi Hotspot with Connectify

Friendly Computers found this article useful for Windows 7 users.

In some computing situations, you might need to create a WiFi hotspot quickly so other wireless devices can use an Internet connection. Today we take a look at Connectify which easily turns your Windows 7 machine into an instant WiFi hotspot.

You might be at a location where there is only one Ethernet connection available (hotel room, office or meeting room etc.) and you need to share the Internet connection with other people or devices. Connectify is a free utility which is light on system resources and makes it easy for you to set up your Windows 7 machine as a secure WiFi hotspot.

Note: Connectify only works with Windows 7 Home and above, Starter is not supported.

Connectify

Installation is quick and easy, and once complete, you can access Connectify from the icon in the Taskbar.

4wifiUnder settings, type in a name for the WiFi network, a password to access it, then decide the type of internet connection you want to share. It allows LAN, VirtualBox Host-Only, Wireless Network Connection, and no Internet sharing. When you’re ready, click on theStart Hotspot button.

1wifiNow you’ll see it running and can begin connecting your other wireless computers and/or devices.

2wifiNow that Connectify is running on the Windows 7 laptop, In this example we go over to an XP laptop and connect it. Open up Wireless Networks and you’ll see the new hotspot we just created that you can connect to.

6wifiYou’ll be prompted to enter in the Network Key (password) you set in Connectify twice, then click on Connect.

Wait for a moment while a network address is acquired.

Here you can see the XP machine is connected to the Geek-fi network we created on the Windows 7 machine.

sshot20100131002121When you go back to the Windows 7 machine you can see the device(s) connected. It also keeps track of devices that were previously connected as well.

66wifiRight click on the Connectify icon in the tray to get different options for running it.

3wifiIn our tests, the signal strength and connection speed was adequate, but may be a bit slower than your used to. Results will vary based on the type of hardware you have sending and receiving the signal. Overall though, if you need to create a Hotspot in a pinch, Connectify is more than capable. If you’re looking for an easy way to share your Windows 7 wireless connection with other devices, and want it to be secure, Connectify get’s the job done.

Download Connectify

Source: http://www.howtogeek.com/howto/9739/turn-your-windows-7-laptop-into-a-wifi-hotspot-with-connectify/

Tuesday, January 26, 2010

Unlock thumbnail previews for Firefox 3.6 on Windows 7

Are you using Firefox browser? Friendly Computers found this article useful for windows 7 and Firefox users.

Firefox users, if you’re running the most recent release on Windows 7 you need to make a tiny tweak to your browser’s configuration.  By default, Firefox shows a single thumbnail when you hover the mouse pointer over its icon in the Windows 7 taskbar with Aero enabled. Here’s what it looks like: single_previewThe problem is, this particular Firefox window actually contains four open tabs, and it could contain dozens. It sort of defeats the purpose of the Aero preview feature if you have to open a window before you can scan which browser tabs you have open. IE8 does it right, showing all open tabs in thumbnail previews when you point to its icon. So how do you add the same feature to Firefox 3.6? Simple:

Open Firefox 3.6 (or later) and type about:config in the Location Bar. You’ll have to click to get past this warning dialog box and open the Preferences page. Use the Filter box (or just scroll down) to find browser.taskbar.previews.enable in the list of preferences. Note that by default it’s set to false. Double-click to toggle the setting to true. The value in the Status column changes to user set and the entire entry turns bold to indicate it’s been changed. It should look like this: firefox_about_config And now aim the mouse pointer at the taskbar again: multiple_tab_previews Every tab (even if those tabs are in separate windows) is now visible from the taskbar previews. You can change the focus to any tab temporarily by pointing at it, and you can close any tab from its thumbnail preview using the X in the upper right corner.

Source: http://blogs.zdnet.com/Bott/?p=1703

Friday, January 22, 2010

SUPERAntiSpyware Portable is the Must-Have Spyware Removal Tool You Need

Is your computer infected with malware, spyware, or rogue/fake antivirus applications? Friendly Computers found this article very useful for removing them from your PC.

If you’ve got a PC infected with malware, spyware, or rogue/fake antivirus applications, the best tool for removing them is the free SUPERAntiSpyware Portable edition.

You might wonder why a portable version is so important… the problem is that the worst malware infections block you from installing malware removal software, and even if you manage to get it installed, most of the time when you try and launch it, you’ll get an error like this one:  image411Note: that’s a real screenshot from a real virus that we cleaned with SUPERAntiSpyware Portable.

SUPERAntiSpyware Portable solves this problem by not only giving you a completely portable version of the application, which consists of a single file you can copy to your USB drive without requiring installation, but it also automatically gives you a random filename so the malware can’t detect it as easily.

You should note that when you download the application, it includes all the latest updates as of when you downloaded it.

Sidebar Geek Note

If you’ve had a lot of experience cleaning viruses, you’ll probably note that you could always run SUPERAntiSpyware as a portable application by installing it to a thumb drive, but the updates didn’t automatically come along with it.

Some of us were also using a hack method involving a batch file and setting environment variables to make sure the updates were installed on the thumb drive, but thankfully the new version fixes the problem by automatically including them. The really ironic thing is that I’d written an article scheduled for next week on how to do just that. Oh well, this is much better anyway.

Using SUPERAntiSpyware Portable

Once you’ve launched the application on an infected machine, you should see a welcome screen, and you can just click the button to start it up.

Pick your language…

And just like that, you’re in the main interface. If you haven’t used the regular SUPERAntiSpyware before, you should click the Scan your Computer button—though if you’ve had it sitting on your system for a while you might want to use the update check first.image_thumb1 Select the locations to scan, and choose to Perform Complete Scan (there’s no point in a quick scan on an infected machine). image58The application will scan through the system and find anything bad on the system, and then let you remove it all easily. Note: this is a screenshot from an infected machine that we successfully cleaned using SUPERAntiSpyware. image59So there you have it, a full endorsement from How-To Geek for SUPERAntiSpyware. I have personally used it to clean at least a dozen machines infected with really terrible rogue/fake antimalware applications.

Note: SUPERAntiSpyware is not an anti-virus software, and is meant for removing spyware and rogue applications that hold your PC for ransom. You still need Microsoft Security Essentials for your real-time protection.

Download SUPERAntiSpyware Portable Scanner from superantispyware.com

Source: http://www.howtogeek.com/howto/9283/superantispyware-portable-is-the-must-have-spyware-removal-tool-you-need/